
There are a few different ways of sewing a gusset into your bags.
Firstly, there is the super easy boxed bottom method which I showed you how to do here.
And secondly, there is the method where you add a fabric panel and that's the one I'm going to show you how to do today.
I made this bag for Miss 8 but as there are so many processes involved (including lining, handles, pleats & template plastic bottom) I will not show you how to do all these as I'll be here forever and a day. Maybe I can revisit the project if anyone is interested in a sew-along.
So.... I didn't use a pattern and kind of made it up as I went along.
- Cut two side panels the same length as the front and back (use whatever width you would like).
- Cut 1 bottom panel, the long piece will be the same width as your front & back piece but the shorter end will be the same as the width of the side panels.
- Aligh the fabric with the bottom. If your fabric needs trimming, do that from the top later. It is best that all pieces at the bottom fit perfectly.Pin then sew both side panels to the front piece of fabric. Right sides together
- Repeat this and join the back panel to the front & sides. Again right sides together.
- Sewing the bottom panel on can be tricky, but there is a knack to getting perfect corners.
- Pin the panel onto your main bag section.
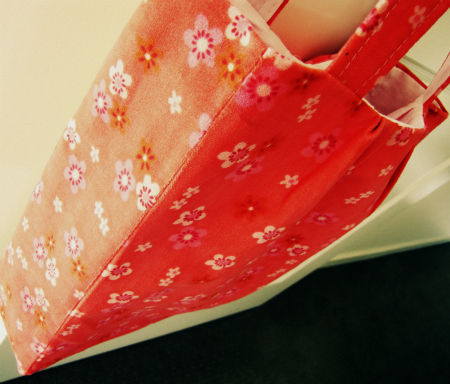
- You will see the natural folds of the gusset start to form
- This is a little hard to explain so hopefully these images will help.
- The two sides fold over to match each other with a loop of fabric inbetween (sorry best I could do!)
- Sew through to the end and cut threads
- When starting again, place your needle down into the fabric and lift foot.
- Swing fabric piece underneath out of way and continue to sew until all sides are done and you are back to the start.
- Clip corners


- When you are done, press seams and turn in the correct way to admire your work.
If you have any queries at all or something needs further explaining please don't hesitate to contact me.
10 comments:
You have the knack of making things look so easy :)
btw I love that fabric!
x
Looks gorgeous Jodie!
Thank you so much! That really helps to see it.
Thanks Margaret (Fussy Eater's Mum), I'm glad the tutorial helped. Thank you for sending your email through asking for the tutorial. Sometimes it just takes an image or two instead of written instructions to understand how it's done.
So, is there any difference between the end result from this gusset bottom and the other tutorial you have?
Hi Darla,
The difference between the two tutorials is this one actually sews in side panels so you have seams running down both sides plus the bottom is also a separate piece so it doesn't have a seam running through the bottom. The other tutorial just uses the original pieces to create the boxed bottom. The sides are created from iron pleats and not seams. But essentially they sit the same in the end.
Yet another BRILLIANT tutorial! Something I really want to try, so I'll let you know if I have any problems when I actually try putting it into practice.
Judi
Sewing purses is what I do as a hobby & I must say a gusset can be a fussy thing to sew! How many times have I unpicked because the corners are bad? Your method is different in that you are sewing off the edge. I'm hoping this is what's required to ensure I'll no longer be unpicking seams! You did a good job explaining a technique that's very difficult to explain.
Gussets have always been a big scary mystery! Thank you so much for the calming instructions! I can hardly wait to add a gusset into a bag! I've included your link in today's blog celebrating National Sewing Month!
http://lanettascreations.blogspot.com/2013/09/honeycomb-gusset.html#.Ukawuoashac
Thank you! I was making a bible bag for a friend and realized it wasn't going to be big enough. Adding gussets was the only way it was going to work. It took a couple tries (first try I was way too tired to be messing with it), but then it worked out. Bag is done and looks great.
Post a Comment